# package install list
url <- 'https://raw.githubusercontent.com/pstat197/pstat197a/main/materials/scripts/package-installs.R'
source(url)

# clear environment
rm(list = ls())Course technology overview
Read this and complete all instructions in the ‘action’ boxes during your lab section. Your TA will walk you through the activity and help to troubleshoot issues and answer any questions along the way.
Objectives:
get oriented with RStudio and RStudio projects
install packages
create a public repository in our GitHub organization
clone your group’s sandbox repository
Prerequisites
To complete the activity you’ll need to:
have all of the software listed on the course technology page installed;
find (or create) your GitHub account credentials (if you are creating an account for the first time, see advice on choosing a username).
ImportantAction
Preparations:
- Log in to your GitHub account.
- Open your GitHub client.
- Open a new session in RStudio.
- Create a class folder for PSTAT197A somewhere on your machine, e.g.,
~/documents/pstat197a.
RStudio projects
First we’ll get acquainted with the basic functionality of the RStudio IDE and the use of projects as a means of organizing files. If you’ve already used RStudio, great – this will still serve to introduce you to how we’ll use RStudio projects in this class.
RStudio Setup
Your TA will briefly review the (default) layout of the RStudio IDE. You should be able to identify/find the following:
console
terminal
file navigator
environment
history
We’ll use several R packages throughout the quarter. Some of these we will install on the go, but we can install several that we’ll rely on now.
ImportantAction
Install packages
Navigate to the console and copy-paste the following commands. You only need to do this once. This will take a minute or two to complete.
Create a local project
Projects are a means of keeping your work organized. When you create a project in a directory on your local machine, RStudio keeps track of project metadata, history, and the working environment so that every time you open the project you see whatever you had open when you last closed it.
ImportantAction
Create a new project:
Select File > New project
Create the project in a new directory as a subdirectory of your class folder
Name it
example-project
Comment: when naming files it’s good practice to avoid spaces, special characters, and the like. A naming convention we try to follow: choose a descriptive name comprising 1-3 words or common abbreviations separated by hyphens.
Take a moment to observe the file navigator. It should consist of a single example-project.Rproj file.
Add content
We may as well populate the project with a few files – so let’s add a dataset and write a short script, as if we’re just starting a data analysis.
ImportantAction
Retrieve data and store a local copy
Open a new script: File > New File > R Script
In the navigator, create a folder called
dataand a folder calledscriptsCopy and paste the code chunk below into your script.
Execute once, then save in the
scriptsfolder asdata-retrieval.Rand close
library(tidyverse)

# retrieve pollution data
url <- 'https://raw.githubusercontent.com/pstat197/pstat197a/main/materials/labs/lab1-setup/data/pollution.csv'
pollution <- read_csv(url)

# write as csv to file
write_csv(pollution, file = 'data/pollution.csv')

# clear environment
rm(list = ls())
Next, we’ll do a simple regression analysis.
ImportantAction
Create a script
Create a new script as before
Copy-paste the code chunk below into your script
Execute once and examine the results
Save in the
scriptsfolder asslr-analysis.R
library(tidyverse)

# load data
pollution <- read_csv('data/pollution.csv')

# examine scatterplot with SLR fit
ggplot(pollution,
       aes(x = log(SO2), y = Mort)) +
  geom_point() +
  geom_smooth(method = 'lm')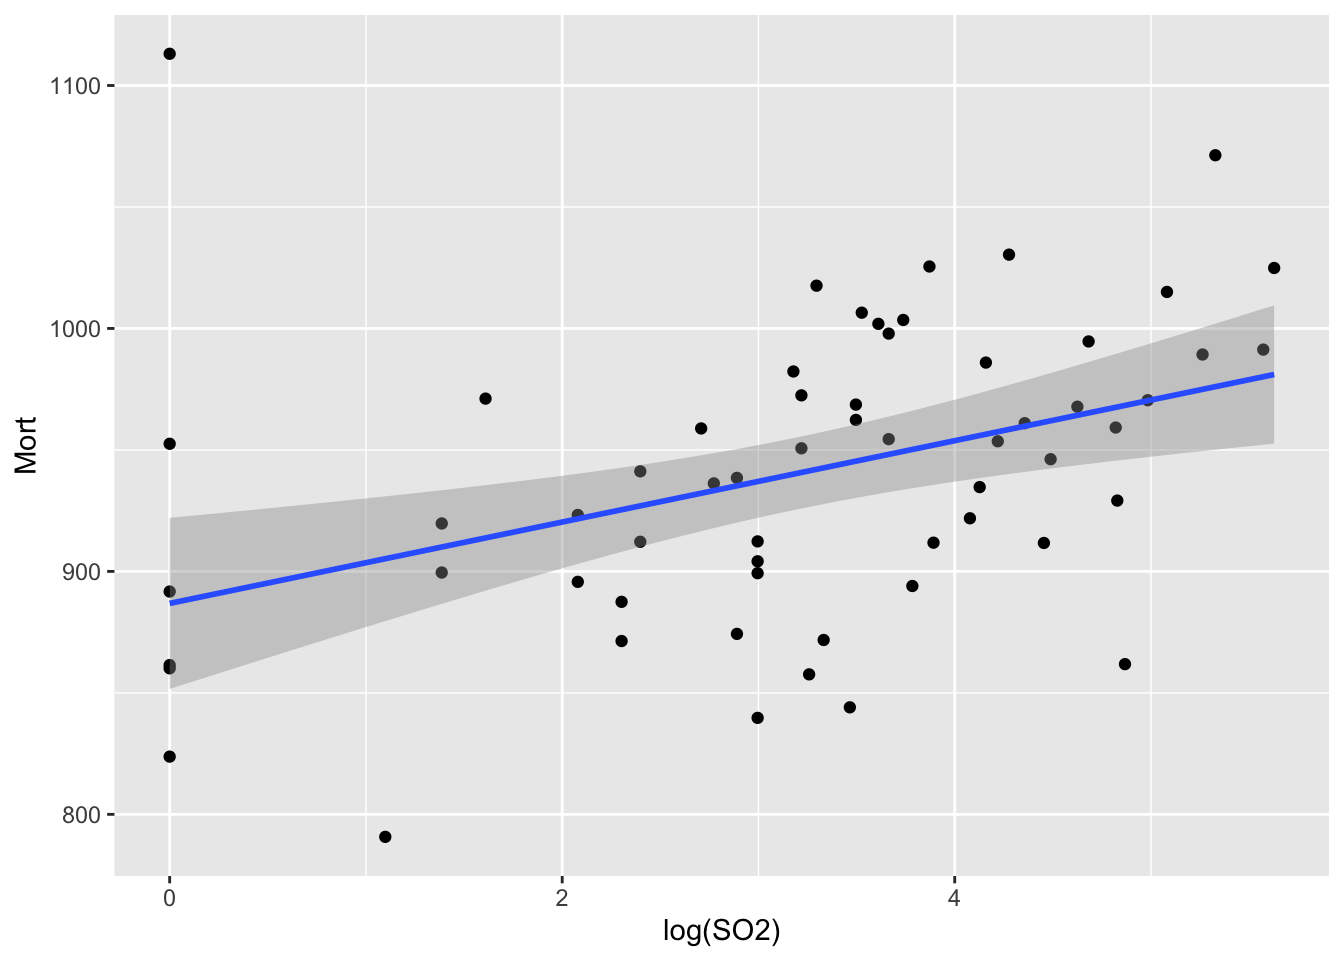
# compute SLR fit
fit <- lm(Mort ~ log(SO2), data = pollution)
broom::tidy(fit)
# A tibble: 2 × 5
term estimate std.error statistic p.value
<chr> <dbl> <dbl> <dbl> <dbl>
1 (Intercept) 887. 17.6 50.4 1.37e-49
2 log(SO2) 16.7 4.99 3.35 1.40e- 3# interpret
fit_ci <- confint(fit, parm = 'log(SO2)')*log(1.2)
paste('With 95% confidence, every 20% increase in sulfur dioxide pollution is associated with an increase in two-year mortality rate between',
round(fit_ci[1], 2),
'and',
round(fit_ci[2], 2),
'per 100k', sep = ' ') %>%
print()[1] "With 95% confidence, every 20% increase in sulfur dioxide pollution is associated with an increase in two-year mortality rate between 1.23 and 4.87 per 100k"Congrats on your first project! You can close the RStudio session now.
We’ll be using projects structured much like what you just set up, but with one catch: we’ll link up our RStudio projects with shared repositories so that we can all collaborate on the same set of project files.
GitHub repositories
We will be using repositories on GitHub throughout the course. A repository is simply a storage space for the files associated with a project.
For the activities in PSTAT 197A, you will work with several different groups over the course of the quarter. Each group will use a shared GitHub repository for the module you are completing together.
All course repositories should be created within the PSTAT 197 course GitHub organization rather than under an individual student’s personal GitHub account.
Before completing this activity, you should have received and accepted an invitation to join the course GitHub organization.
For now, your group will create a group sandbox repository that you can use to practice working collaboratively with Git and GitHub during our next class meeting.
ImportantAction
Create your group’s sandbox repository
- Go to the PSTAT 197 course organization on GitHub.
- One person at your table should create a new repository in the organization.
- Name the repository according to the naming convention provided by your instructor, such as
sandbox-group-01. - Set the repository to Public.
- Do not initialize it with any additional files unless instructed to do so.
- After creating the repository, add the other members of your table group as collaborators with permission to contribute to the repository.
- Each group member should confirm that they can access the repository on github.com.
Keep the repository page open; you will need its URL shortly.
Git and GitHub
At some point in time – possibly quite recently – you had to install Git on your local machine, as well as create a GitHub account. Git and GitHub are two different things.
Git is version control software that enables you to systematically track and control file changes within a repository – a collection of files, possibly with some directory structure. (The definition of ‘repository’ is simply ‘storage place’.)
GitHub is an online platform for hosting repositories remotely. A public repository can be viewed by anyone, but only people with appropriate permissions can directly contribute changes to it.
This allows multiple members of a group to collaborate on the same collection of files while Git keeps track of the changes that are made.
local <> remote
Usually remote repositories are not updated by directly editing files on github.com. Contributors generally need to execute code and test their changes on their own computers before sharing those changes with the rest of the group.
Instead, contributors prepare changes on their own machines, where they can run and test their code, and then update the remote repository once their changes are ready.
This process involves communicating information between local and remote locations. For this purpose, each contributor needs a local copy of the remote repository.
Cloning a repository
In Git terminology, a clone is a local copy of a remote repository. Creating a clone copies the repository files to your computer and establishes the connection between the local and remote repositories so that changes can be sent to and received from GitHub.
You only need to create a clone once for each repository.
To clone a repository, all one needs is:
- the remote repository URL;
- the local destination where the clone will be created;
- permission to access the repository, if the repository is private.
Here you’ll clone the group sandbox repository your group just created. You will need its URL. If you happened to close the page, you can find the repository by returning to the PSTAT 197 organization on github.com.
ImportantAction
Clone the sandbox repository
- Open your GitHub client (GitKraken, GitHub Desktop, or similar) and ensure you are logged in to your GitHub account.
- Find the option to clone a repository.
- Select or enter the URL of your group’s sandbox repository.
- Choose the location on your computer where you would like the local copy to be stored.
- Complete the cloning process.
- Check your file navigator to confirm that the repository was copied to your computer.
Every member of the group should clone the same repository onto their own computer.
An alternative is to create the clone using a terminal command. In the terminal, navigate to the desired destination and enter:
git clone https://github.com/ORGANIZATION/REPONAMEFor example:
git clone https://github.com/pstat-197a-fall2026/sandbox-group-01
NoteRemarks
On terminal commands:
- It’s recommended to manage Git actions through a visual client at first, as it’s much easier to see and understand what’s happening.
- However, if you know exactly what you’re doing, executing simple actions via Git in the terminal can be more efficient at times.
- For example, you can keep a terminal open in RStudio and manage your repository workflow from there, without having to toggle between environments.
- Try experimenting with terminal commands from RStudio after you have a little experience with basic Git actions.
Repositories for course modules
You will follow essentially the same process for each of the five PSTAT 197A modules.
For each module:
- You will be assigned to a group for that module.
- One member of the group will create a new public repository within the PSTAT 197 organization.
- That student will add the other members of the group as collaborators.
- Every group member will clone the same repository to their own computer.
- The group will use that repository for its work on that module.
Your groups may change from one module to another. A new repository should therefore be created for each module rather than continuing to use a repository belonging to a previous group.
These module groups are for practicing the skills you will need later in the capstone sequence; they are not your final capstone project groups.
Checklist
Have you completed all of the activity action items?
- Install software: R, RStudio, Git, and a GitHub client
- Create a GitHub account
- Accept the invitation to join the PSTAT 197 GitHub organization
- Install R packages that will be used frequently
- Create a local project in RStudio
- Create or join your group’s sandbox repository
- Clone the group sandbox repository